Saturday, August 9, 2008

My Prince Chipboard Card

Every girl needs a Prince Charming and I certainly married mine 4 1/2 years ago. To celebrate his birthday I recruited his Dad to help me with his gift. This is one of the only times I was able to surprise him with a birthday gift! What did I get him you ask? Well he always talked about what a shame it was that there weren't enough Canadian flags flying in our town and that one day he was going to put up a huge flagpole in front of our house. So I beat him to it and had a flagpole made and bought all the rest of the stuff and viola! A birthday gift that for once was a surprise. So now that you know all of the history here is the card that I made for my Beloved. I used chipboard as the base and covered it in Basic Grey papers. I absolutely love these papers (as you already know) for use on masculine cards and gifts. Because you can't really frill up a manly card these papers have enough punch to them to be gorgeous on their own. Yet at the same time you can do beautiful girly things to them as well. The monogram "P" is a Heidi Swapp chipboard letter that I covered in coordinating paper form my Basic Grey collection. The metal charm was in my stash that I know I bought at my LSS but have no clue who it came from anymore. We all know that a card with out a ribbon barely qualifies so here out of respect for the masculine intended I substituted BG paper. The closure is an old button from my sewing stash and I used a leather string from a jewellery making experience as the tie. Inside I created my own embellishments using chipboard and metal. and used a transparency to type out my birthday wishes. This was one of first experiences in working with chipboard and I must say I loved it and have been hooked ever since. Blessings to you!

Friday, August 8, 2008

Mini Clipboard

I love these mini clipboards! They are fantastic for taking to work. Especially if you are in a cubicle style office and space is at a premium. This is the perfect solution for having a photo displayed in this setting. And because it is a clipboard you can update your pic so very easily at any time. This particular clipboard I have covered in BG's Dasher line of papers. By the way this line creates beautiful Christmas cards.I wanted to keep this clipboard looking a cross between "office drudgery" and "good times". Therefore I used those office clippies again to use in not holding my pics more securely but to add a splash of colour and dimension. The embellishment at the bottom is actually an old bracelet of mine that tarnished. It has two strings of rhinestones that still glitter beautiful but contrast the "drudgery" look of the remaining strands. My tag is simply adhered to the clip using an ethereal ,gossamer piece of ribbon (it's from my wedding bouquet) I think my favorite part about 
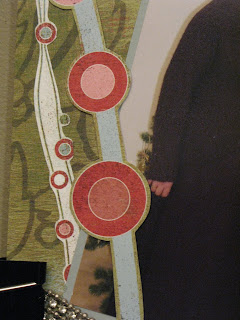
this clipboard is the run of circles on the left hand side. It's adhered strategically so that you can slip a photos underneath in some spots. The circles are actually cut out form one of the papers I had in my Dasher stash. What are some of your favorite clipboard creations? What do you create them for? Enjoy your weekend, blessings to you!

Thursday, August 7, 2008

Scarlet's Love Letter


I needed a card for Valentines Day for my husband...these I find difficult. I want it to be lovey-dovey but it's still for a man and needs to stay away from "sugar and spice and all that's nice..." So I compromised and really loved the card. It was quite simple to boot!

I started with a black card stock and turned to my all time favorite paper - Scarlet's Letter(Basic Grey). Used a corner rounder on everything and adhered. I covered the seam with ribbon - but no bows! Instead to give it some dimension I used a foam double sided tape for the ribbon. It actually sits 1/8" high. The rub ons were a freebie I won at a crop and work fantastic! They are in French and rub on beautifully. They are from Accent Scrapbooking, I believe it is a primarily French line of product.

The inside was the same red paper inside with another rub on from Accent Scrapbooking and that was it. Easy as pie.
Except I can't make pie so ...
Blessings to you today!

P.S. Sorry about this post quality..I am having problems :(

Tuesday, August 5, 2008

A "Whiteboard " Clipboard

For a long time I was without a camera of my own. Long story short is that it died after borrowing it out, never to be replaced again until visa points were accumulated! So in that time of sadness and mourning I started creating a lot of altered art using all of my favorite scrapbook items. This legal sized clipboard was one of them.

I picked it up for a couple of dollars at my local Buck or Two store - as well as a few mini clipboards and other such items. This particular one I created for my sister as a gift for some reason or another...can't remember! As you can see in the picture I once again used my all time favorite paper: the Scarlet's Letter from Basic Grey. Because of the size of the clipboard I was short 2" on paper and was having a difficult time deciding what to cover those 2" with. I ended up using some card stock that I stamped flourishes on using black and gold. This helped to blend the two better.

Next step was to attach my ribbon. I didn't like the way the seam looked where my patterned paper ended and the card stock started. This particular ribbon I received as a gift through my church's Secret Sister program. I found out later it was from Costco (Cdn version of Sam's Club). I chose to use this flat twill here because it has a peel away adhesive on the back. Can't use it to tie a ribbon but it works beautifully for things like this. I wanted this clipboard to be functional as well so I took transparency paper (because who on earth is going to cover that beautiful paper up!) sent it through my printer and using my all time favorite font Scriptina created a whiteboard like layer to keep track of things on. I adhered the transparency in a couple of spots and then went a little nuts with buttons. I really, really, really like them! These were a mixture of buttons I have had forever as well as some from a package I bought from Dollarama. A few were strategically placed to help cover the adhesive...see whiy I love them!

I grabbed an office clip - can not ever remember their real name - and very carefully and slowly applied some rub ons. The end of the clip is on of my fave parts...more buttons! To finish it off I tied a ribbon around the clip and proceeded to carefully wrap it up to give away.

So even though I was cameraless, I was still able to create...just had to think outside the camera! I think this is when I also started making cards. Blessings to you!

Monday, August 4, 2008

Sunshine Blueberry Muffins

These have to be some of the best muffins and they are sooo easy to make! What makes them a little extra special is the Lemon Sugar Topping.If you want the muffins to stay on the healthier side omit the topping.

Sunshine Blueberry Muffins
yield: 12 muffins

1 3/4 cup flour
1/2 cup sugar
2 1/2 tsp baking powder
3/4 tsp salt
1 egg, well beaten
1/3 cup vegetable oil
3/4 cup milk
1 cup fresh blueberries
2 tbsp sugar
grated rind from 1/2 lemon

Topping:
2 tbsp butter, melted
Juice from 1/2 lemon
1/4 cup sugar

1. In large mixing bowl, mix all dry ingredients
2. Combine egg, oil and milk. Add to dry ingredients, stirring just until moistened.
3. Toss blueberries with 2 tbsp sugar and the lemon rind. Fold carefully into batter.
4. Fill greased muffin pan or liners 2/3 full. Bake for 20 minutes at 400.
5. While muffins bake mix butter and lemon juice for topping. Keep sugar in separate bowl. While muffins are still hot dip first into the lemon butter mixture and then in sugar. Enjoy!


Sunday, August 3, 2008

Taylored Expressions Cupcake Challenge 27

I've been a regular visitor to tayloredexpressions.blogspot.com for a couple of months and have always admired the professional looking creations that have inspired me over and over again. So this weekend I decided that I was going to do something for the first time - submit a card. It isn't really a big deal and yet it is...for some reason. So here is a blurb from Taylor's blog with some of the details...You're not required to use cupcakes for the challenge, but if you got 'em why not use 'em!? :) You're welcome to create something other than a card, just stick as closely to the sketch as possible and you'll be eligible for the prize drawing and Featured Cupcake Sampler honors. If you're uploading to Splitcoast use keyword TECC27 (for Taylored Expressions Cupcake Challenge 27). Leave a comment on this post with a link to your blog post or gallery upload so I can check it out! You must have your cards uploaded by Monday, August 4th at 8am PST to be eligible for the prize drawing. I can't wait to see what you come up with! I hope you all have a wonderful weekend!
So here is my version of Taylor's sketch. Unfortunately the pic is quite blurry so make sure you double click on it to get a clear picture. As y0u can see I have definitely taken some liberty with the sketch but really enjoyed the way everything came together in the end. My favorite part about this card is a toss up between the embossed cupcake liners and the 3D frosting... something I just discovered called Liquid Applique. Love both but then I also got to use my new Martha Stewart Doily punch. It is soo pretty and delicate. Anyways, gotta run, have a great week!

Supplies: Card stock from my Colorblok stash, patterned paper from Autumn Leaves (Walmart), Inkadinakadoo Stamps, Liquid Applique and Stickles

Friday, August 1, 2008

Heavenly Hamburgers

These are our favourite hamburgers. Let me be clear on this because I will not be held responsible if you don't like them. All joking aside I do think these are amazing! Several tricks I've learned is that you need to handle the meat as little as possible. Use a big bowl and when adding seasonings add them evenly over the entire bowl and then do a quick mix. Here we used these hamburgers and created our own Mozza Mushroom Burgers. They were sooooo good! Freshly seasoned and sauteed mushrooms, creamy mozzarella cheese, crisp salty/smoky bacon. Aahh I am so hungry for these again. This is a large recipe that also works well to freeze.

Heavenly Hamburgers

6 lbs very lean ground beef
1 box stuffing mix
1 small onion
1 envelope onion soup mix
4 eggs
3 pinches salt
1 heaping tbsp Montreal Steak Spice
1 tbsp Epicure Beef & Steak seasoning

In separate bowl combine processed stuffing crumbs, finely chopped onion, soup mix, beaten egg, salt and spices. Mix well and pour over ground beef. Mix with hands just enough to blend everything. Do not overwork. Shape into patties in size of your choice and place in freezer containers. Separate them using wax paper for easy removal later.

Yield: I usually get 28 hamburgers out of this recipe.