Showing posts with label gifts. Show all posts

Friday, September 26, 2008

Birthday Tin

For my husband's 30th birthday I really wanted something special. But as it seems to to have gone in the last year, all of those special holidays and birthdays come and go with us being relatively "penniless" SO the trick is to create something personal with a heartfelt message using things I already have. Now I realize that these kinds of things are really not up my husband's alley but it makes me feel like I have at least given him something for his special day. Using a CD tin I used different papers from Basic Grey's Scarlet' Letter line, some self adhesive rhinestones, a sharpie marker and an adhesive that is near impossible to remove. The back side is covered with 30 different things I love about my special man. The bottom stamped image is from FontWerks. I used Staz-On ink for all of my stamping. The red metal embellishments are from my local scrap shoppe. Inside the tin I glued another smaller tin. This mini tin contains an accordion scrapbook. My birthday message is written directly on the tin using a fine tip Sharpie marker.I want to use this mini as an opportunity to consciously remember to take photographs of my hubby and I together. On a recent hunt for these type of pictures I found next to none! How awful! LOL On the opposite side I placed a pic of me. The background papers are once again from BG's Scarlet Letter.

Friday, August 8, 2008

Mini Clipboard

I love these mini clipboards! They are fantastic for taking to work. Especially if you are in a cubicle style office and space is at a premium. This is the perfect solution for having a photo displayed in this setting. And because it is a clipboard you can update your pic so very easily at any time. This particular clipboard I have covered in BG's Dasher line of papers. By the way this line creates beautiful Christmas cards.I wanted to keep this clipboard looking a cross between "office drudgery" and "good times". Therefore I used those office clippies again to use in not holding my pics more securely but to add a splash of colour and dimension. The embellishment at the bottom is actually an old bracelet of mine that tarnished. It has two strings of rhinestones that still glitter beautiful but contrast the "drudgery" look of the remaining strands. My tag is simply adhered to the clip using an ethereal ,gossamer piece of ribbon (it's from my wedding bouquet) I think my favorite part about this clipboard is the run of circles on the left hand side. It's adhered strategically so that you can slip a photos underneath in some spots. The circles are actually cut out form one of the papers I had in my Dasher stash. What are some of your favorite clipboard creations? What do you create them for? Enjoy your weekend, blessings to you!

Tuesday, August 5, 2008

A "Whiteboard " Clipboard

For a long time I was without a camera of my own. Long story short is that it died after borrowing it out, never to be replaced again until visa points were accumulated! So in that time of sadness and mourning I started creating a lot of altered art using all of my favorite scrapbook items. This legal sized clipboard was one of them.

I picked it up for a couple of dollars at my local Buck or Two store - as well as a few mini clipboards and other such items. This particular one I created for my sister as a gift for some reason or another...can't remember! As you can see in the picture I once again used my all time favorite paper: the Scarlet's Letter from Basic Grey. Because of the size of the clipboard I was short 2" on paper and was having a difficult time deciding what to cover those 2" with. I ended up using some card stock that I stamped flourishes on using black and gold. This helped to blend the two better.

Next step was to attach my ribbon. I didn't like the way the seam looked where my patterned paper ended and the card stock started. This particular ribbon I received as a gift through my church's Secret Sister program. I found out later it was from Costco (Cdn version of Sam's Club). I chose to use this flat twill here because it has a peel away adhesive on the back. Can't use it to tie a ribbon but it works beautifully for things like this. I wanted this clipboard to be functional as well so I took transparency paper (because who on earth is going to cover that beautiful paper up!) sent it through my printer and using my all time favorite font Scriptina created a whiteboard like layer to keep track of things on. I adhered the transparency in a couple of spots and then went a little nuts with buttons. I really, really, really like them! These were a mixture of buttons I have had forever as well as some from a package I bought from Dollarama. A few were strategically placed to help cover the adhesive...see whiy I love them!

I grabbed an office clip - can not ever remember their real name - and very carefully and slowly applied some rub ons. The end of the clip is on of my fave parts...more buttons! To finish it off I tied a ribbon around the clip and proceeded to carefully wrap it up to give away.

So even though I was cameraless, I was still able to create...just had to think outside the camera! I think this is when I also started making cards. Blessings to you!

Thursday, July 31, 2008

Monogrammed Cards

So I have been seeing the Just Rite Monogram stamp everywhere. And I really like it, especially to use in creating a gift set for a man. But I firmly told myself that no more purchases for a long time...I must use up some of my stash!

So I created a very simple card using the Martha Stewart stamps. I think it turned out quite well. Too give it a little oomph I embossed the monogram and then mounted it on a scallop using an adhesive foam I had in my stash from who knows when. The inside features some of the same papers I used on the outside. . And that is pretty much it. A really quick card to make for yourself or in a mass setting for a gift like I did here. My mini gift set featured the same cards done on two different card stock colors.

Products: Basic Grey paper (Blitzen), bazzill card stock, Martha Stewart acrylic stamps, Marvy Uchida pink scallop punch, Fiskars circle template, embossing powder from Walmart.

Wednesday, July 30, 2008

Diaper Bag Tags

I think this is one of favorite things I've made in a really long time! I saw somewhere in www an idea for diaper bag tags and instantly my mind just kind went all over the place thinking about how I could do mine own.

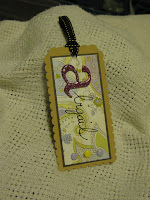
So here we are. I used the largest tag from a pack of Maya Road scalloped chipboard tags and painted it a light tan colour that I knew would match my sister's diaper bag.

Next I measured out my paper I used some scrap card stock for the matting and then cut 2 pieces of patter end from my favorite company Basic Grey. I absolutely love their papers!


Next I worked on the monograms. These Heidi Swapp chipboard letters are wonderful. Sturdy enough to handle all the stuff I did it. I know there is the fancy dimensional "stuff" meant for this kind f thing, but I don't have any and figured out a pretty good alternative. You will need a bottle of clear nail polish and glitter. Using your nail polish paint a small section at a time and then dump glitter onto it. Remove excess glitter and proceed onto the next section and repeat until your monogram is covered. Your next step is to put nail polish over the glitter. The best way to do this is to let the polish drip from your brush onto the monogram and then lightly spread it. Be sure to get the entire surface. It will take a while to dry before you can do your next coat. Keep repeating this until you have the desired look. Before using it on the tag it is a good idea to let it dry for several hours or overnight. The end result is a beautiful glittery monogram that is safely protected and shiny! It looks absolutely amazing in person. I need to learn to take better pictures!
After that I adhered it to my tag and finished it off with a handwritten name.
At that point it still needed something so I took 3 brads snipped of the prongs and hot glued them to the tag. Then it was finished. I found some pretty ribbon to use as chain and now all the mamas want one! A great gift that doesn't cost a lot but is so very personal and a great keepsake.


Sunday, July 27, 2008

Anniversary Album


Together with my sister, I created a scrapbook album to give to our parents for their long awaited anniversary trip. We planned the album with some very specific things in mind.

1. The album was to be completely finished. All that Dad & Mom would need to do was to adhere pictures. This meant we even penciled in where the pictures were to go and their exact size...along with tips on what types of pictures to use.

2. The highlight of the album needed to be the pictures and the memories of the trip...so we stayed away from the bright colours and the very obvious travel themed papers & embellishments. All in all we had a lot of fun and were quite happy with the finished result.

We tried to think through a typical holiday and the types of things that are the usual highlights as well as a few of the more evryday holiday memories. We hoped that htis would end being an album that told the whole story of the vacation.


Although my parents vacation didn't quite go as planned, there were still some very good things that happened as a result...like a surprise visit from them!


Products used: Basic Grey papers, Heidi Swapp Chipboard and a lot of misc. stuff from my stash